Shopify’s default theme is great for getting started, but it’s not your brand until you customise it.
If you’ve been wondering how to edit your Shopify website to match your brand voice, visuals, and customer experience, the good news is that Shopify makes it surprisingly simple.
And you don’t need to be a designer, hire an expert Shopify store developer, or be tech-savvy to edit Shopify theme settings, edit Shopify website layouts, or update the Shopify home page.
After reading this guide, you will know:
- How to edit the Shopify home page
- How to edit the home page on Shopify sections
- How to edit pages in Shopify
- How to bulk edit products in Shopify
- How to bulk edit tags in Shopify
- How to edit a Shopify website step-by-step
- How to safely use Shopify’s theme editor without breaking your store
Everything here applies to all Shopify stores no matter whether your store sells in the USA, UK, Australia, or India, because the Shopify dashboard behaves the same globally.
Let’s start by accessing your Shopify Admin.
Table of Contents
Step 1 — Access Your Shopify Admin (The Starting Point)
You will land on your Shopify admin dashboard by visiting:
https://admin.shopify.com/store/
You’ll come back to this dashboard often while learning how to edit Shopify website, so keep it bookmarked.
Once you’re inside the admin, follow:

Online Store → Themes → Customize
This “Customize” button opens the Shopify Theme Editor, where most of your design and layout changes happen.
Step 2 — Understanding the Shopify Theme Editor
Before we jump into editing the Shopify website, let’s decode what you actually see.
When you click Customize, Shopify shows you two main areas:
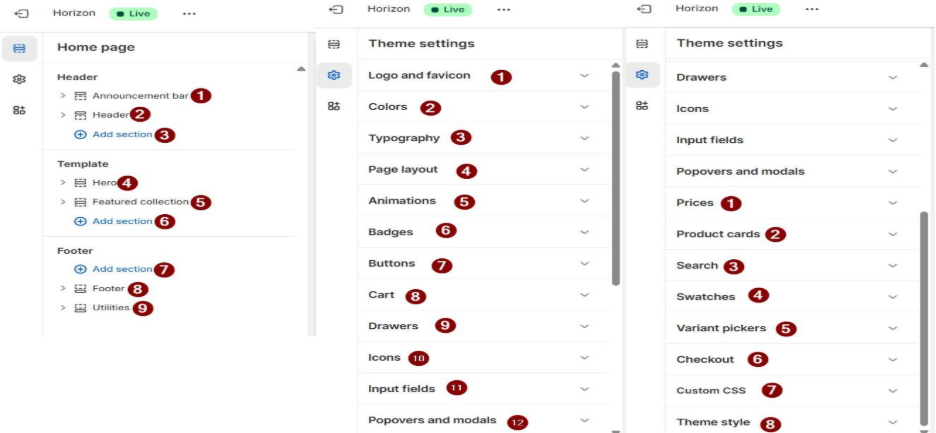
- Shopify Home Page Sections (your layout blocks)
- Theme Settings (global design settings)
When figuring out how to edit a Shopify website, knowing the difference helps you edit faster and avoid mistakes.
How to Edit the Shopify Home Page (Main Website Editing Area)
Your Shopify home custom dashboard is the first impression of your store. This is where you’ll spend most of your time when learning how to edit the home page on Shopify.
Let’s talk about each section and when you should use/edit it.
Announcement Bar
A slim strip at the top of your website.
Great for: free shipping offers, discounts, store updates (“New winter collection drops Friday”), or policy changes.
Customisable options:
- Text
- Link
- Colour scheme
A strong announcement bar increases click-throughs and conversions — especially for USA shoppers who expect quick updates.
Header
This is your top navigation area.
When merchants ask “how do I edit Shopify website navigation?” — this is the section.
Your header contains:
- Logo
- Main menu
- Search icon
- Cart icon
- Login/profile icon (optional)
You can customise:
Logo width, colour, menu style, transparency, and layout.
Custom Header Section (Optional)
You can add an extra strip under the header for:
- Trust badges
- USP highlights
- “Free shipping” messages
- Limited-time promotions
This helps improve conversions without overwhelming the Shopify home page.
Hero Banner (Big Main Banner)
This is your “main” banner area — the first thing customers see.
You can edit:
- Background image or video
- Text heading
- Subheading
- Button
- Alignment
- Overlay colour
A well-designed hero can double your Shopify homepage conversion rate.
Featured Collection
This section shows your best-selling or newly launched products.
Perfect for showcasing:
- New Arrivals
- Best Sellers
- Seasonal drops
- USA-focused collections (e.g., “4th of July Deals”)
Editing this section is crucial for brands learning how to edit home page on Shopify effectively.
Custom Sections (Your Brand Story Area)
These are blank, highly flexible sections you can use for:
- Rich text storytelling
- Brand images
- Testimonials
- Videos
- Comparison charts
- Feature lists
- Icons
- UGC/Reviews/Testimonial (User-generated content)
This is where you add personality to your Shopify home page.
Custom Footer Section
An optional section above the footer used to highlight:
- Guarantees
- Shipping info
- Reviews
- Payment badges
- Newsletter signup
USA customers especially look for trust signals here.
Footer
The footer contains:
- Legal pages
- About
- Contact
- Policies
- Social icons
- Payment icons
- Language & currency selector
Editing the footer is a simple but important aspect of editing a Shopify website for legal compliance.
Utilities (Depends on Theme)
These may include:
- Back-to-top button
- Sticky add-to-cart
- Promo banners
- Additional spacing options
These improve the user experience and are worth exploring.
Step 3 — How to Edit Shopify Website Using Theme Settings
While Shopify home page sections control layout, Theme Settings control your entire website’s visual identity.
Here’s what each setting means.
Logo & Favicon
Upload your brand logo and your browser tab icon.
A favicon makes your store look legitimate, especially to US buyers who check for trust signals.
Colors
Set your sitewide brand colors:
- Buttons
- Text
- Backgrounds
- Links
- Accents
A consistent colour system makes your Shopify website look professional.
Typography
Choose your heading and body fonts.
Font choice heavily influences brand perception — premium, playful, minimal, corporate, etc.
Page Layout
Defines:
- Website width
- Content spacing
- Container size
Useful when trying to make your Shopify home page feel more spacious or compact.
Animations
Enables fade-in or hover animations.
Use lightly — too much animation slows down mobile performance.
Badges
Customize:
- “Sale” badge
- “New” badge
- “Sold Out” badge
Good for stores that frequently run promotions.
Buttons
Adjust shape, size, hover effects, and color.
The “Add to Cart” button should always stand out visually.
Cart
Choose between:
- Cart drawer
- Popup
- Full cart page
USA stores often prefer cart drawers for faster checkout flow.
Drawers
These slide-in panels are used for menus, filters, or carts.
Useful for mobile UX.
Icons
Choose between outlined or solid styles for:
- Cart
- Search
- Account
Small tweaks that refine your brand identity.
Input Fields
Defines how forms look:
- Borders
- Padding
- Corners
- Focus effects
Clean forms help improve email signup rates.
Popovers & Modals
Used for:
- Quick views
- Popups
- Tooltips
You can adjust the background and close behaviour here.
Prices
Controls compare-at prices and formatting.
Useful for brands running seasonal promotions.
Product Cards
These mini product tiles appear on:
- Collection pages
- Search results
- Recommendation sections
You can edit layout, hover style, quick add buttons, and info display here.
Search
Improves the search experience with suggestions and vendor display.
USA buyers search more than they browse, making this feature critical.
Swatches & Variant Pickers
Choose between:
- Buttons
- Pills
- Dropdowns
- Colour swatches
Swatches make fashion and home décor stores significantly more user-friendly.
Checkout
Limited customisation, but you can adjust:
- Logo
- Colors
- Background
It’s enough to maintain branding without modifying Shopify’s secure checkout system.
Custom CSS
Use this only if you understand CSS.
Small CSS tweaks = huge visual improvements.
Theme Style
Some themes include style profiles like:
- Minimal
- Modern
- Bold
You can switch styles without losing content.
Step 4 — How to Edit Pages in Shopify (Important)
Your store needs more than a home page to feel complete. Creating and editing pages is essential for:
- Shipping & delivery
- Returns & exchanges
- Privacy policy
- Terms of service
- About Us
- Contact
- FAQ
- GDPR/CCPA compliance (USA + EU)
Here’s how to edit pages in Shopify clearly:
To create a new page:
- Go to Online Store → Pages
- Click Add Page
- Add a title + content
- Save
To edit an existing page:
- Online Store → Pages
- Select the page
- Edit using the rich-text editor
- Save
This is how to edit a Shopify website’s page beyond just the home page and theme.
H2: How to Bulk Edit Products in Shopify (Quick & Safe Method)
If you manage a growing product catalog, editing items one by one becomes impossible. Thankfully, Shopify gives you multiple ways to bulk edit products Shopify, but not all methods are equally safe.
Below is the cleanest walkthrough of how to bulk edit products in Shopify without running into errors.
Recommended Method — Shopify’s Built-In Bulk Editor
The built-in bulk editor works like a spreadsheet directly inside your Shopify admin.
This is the safest way to bulk edit products Shopify because:
- No formatting issues
- No broken CSV files
- No encoding errors
- Changes update instantly
- Easy to save in small batches
If you’re new to editing a Shopify website, start here.
Step-by-step: How to Use the Bulk Editor
Go to Products
Dashboard → Products
Select the products you want to edit
Tick multiple products or click “Select All”.
Use Filters (Optional)
For example:
- Filter by tag
- Filter by “Active”
- Filter by type
This is great when you only want to update a certain category.
Click “Bulk Edit”
This opens Shopify’s spreadsheet-style editor.
Choose Columns to Edit
Click Columns → Add/Remove Columns.
What You Can Bulk Edit in Shopify
Using this method, you can update:
- Descriptions (Great for global changes)
- SEO fields (Meta title, description, URL handle)
- Pricing (Price, compare-at price, cost per item)
- Inventory (Track quantity, stock levels)
- Shipping details (Weight, package info)
- Identifiers (SKU, barcode, vendor, product type)
- Tags & product status
- Category metafields (colour, size, fit, gender, shoe size, etc.)
It’s also a clean way to bulk edit tags Shopify, especially for large collections.
Bulk editing descriptions is especially powerful if you’re refreshing promotions or removing outdated messaging.
How to Safely Bulk Edit Products Shopify (Avoid Data Loss)
Bulk editing can be risky if you’re new to how to edit Shopify website, so follow these practices recommended by our Shopify development services team:
Save Every 20–30 Changes
Never edit 200 items and save once, if the internet drops or Shopify times out, you’ll lose all progress.
Copy-Paste Smartly
If the same line needs updating across products (e.g., “Free shipping over $100”),
update one product → copy → paste into others.
Keep Columns Minimal
Only show and edit what you need.
The fewer fields open, the fewer mistakes.
Alternative Method — Export CSV to Bulk Edit Products Shopify
The second way to bulk edit products in Shopify is by exporting all products to a CSV, editing them in Excel or Google Sheets, and importing them back.
This method is best for:
- Huge catalogs (10,000+ items)
- Complex changes across hundreds of cells
- Massive copy/paste tasks
But it comes with risks.
How to Export Products to CSV
- Go to Shopify Admin → Products
- Select all products or only the ones you want
- Click Export
- Choose All Products or Selected Products
- Shopify emails you the file
- Open in Google Sheets (recommended)
- Make edits
- Import back into Shopify
This method is useful when you’re updating:
- Pricing rules
- Multiple SKUs
- Tags
- Brand names
- Metafields in bulk
It also works well when doing a bulk edit tags Shopify workflow.
Things to Keep in Mind Before Bulk Editing with CSV
When you import a CSV, Shopify sends an email with error reports.
But here’s what we recommend to avoid 90% of issues:
Always Export a Fresh CSV Before Editing
Never reuse old files. Shopify updates fields constantly.
Use Google Sheets or enable UTF-8 Compatibility in Excel
Excel uses the wrong encoding by default → leads to Shopify CSV errors.
Stick to the Original Column Structure
Never rename headings; Shopify relies on exact formatting.
If Errors Persist, Contact Shopify Support
They can analyse your CSV import log.
Do It in Small Batches
Uploading 10,000+ rows at once can break or corrupt data.
Real example:
A user bulk-edited thousands of products and got a “Variant Price Incorrect” error on import—still unresolved after two support agents.
This shows why safety matters.
Bulk Editing Inventory (Separate Area in Shopify)
Inventory editing needs its own mention.
To bulk edit inventory:
- Go to Products → Inventory
- Adjust:
- Available
- Committed
- On Hand
Useful when syncing across warehouses or doing seasonal restocks.
Good Store Practices to Avoid Bulk Editing Nightmares
These habits save you from massive cleanup work later.
1. Don’t Put “Static Offers” Inside Product Descriptions
Avoid adding lines like:
- “Free shipping over $300”
- “Buy 2, get 1 free — this month only”
- “Ships within 24 hours”
- “Holiday sale ends Dec 22nd”
If you ever change these offers, updating 10,000 descriptions becomes a nightmare.
2. Use Metafields Instead
If you’re learning how to edit Shopify website the smart way, metafields are the secret weapon.
Metafields let you store dynamic data such as:
- Ingredients
- Specifications
- Care instructions
- Warranty
- Dimensions
- Nutritional details
- Colour, fit, size, gender, etc. (for apparel)
Why Metafields Matter:
- You update once → changes everywhere
- You avoid cluttered descriptions
- You keep product pages structured
- You scale better (especially in USA markets with large catalogs)
Apparel?
Use metafields for sizes, fabric, fit, etc.
Furniture?
Use dimensions and material metafields.
Grocery?
Use nutritional and expiry details.
This is how pros edit Shopify website without constant manual work.
3. Create Unique Product Templates (Advanced But Powerful)
Never use one product template for all items.
Shopify allows you to create product-specific templates.
How to create new templates:
- Online Store → Themes → Customize
- Product page
- Dropdown (top) → Create Template
- Name it (“Skincare Serum” / “Running Shoes”)
- Customize
- Assign to specific products
This allows you to add:
- Custom FAQs
- Custom icons
- Unique images
- Special size guides
- Guarantee sections
- Brand storytelling
This is a simple but powerful step when learning how to edit Shopify website for conversions.
4. Use AI to Generate Custom Sections (New Shopify Feature)
Many modern themes have a Generate block.
You type:
“Create a comparison chart for our running shoes lineup”
Shopify generates:
- HTML
- Liquid
- CSS
- Full section layout
Then you refine with follow-up prompts.
This feature bridges the gap between advanced development and everyday store owners.
Still, for performance and bugs, it’s smart to ask a Shopify developer to review.
5. Drag-and-Drop CRO Psychology (Little Changes, Big Wins)
This is where editing your Shopify website becomes strategic.
Small repositioning can boost conversions:
- Move “In Stock” below the Buy button → reduces hesitation
- Move reviews above the fold → boosts trust
- Put trust badges right under “Add to Cart”
- Shift price above product title → improves scanability
- Move Shipping & Returns info higher → improves buying confidence
USA shoppers especially scan pages FAST.
Smart layout supports faster decision-making.
6. Secret Preview Trick (Before Going Live)
Want to preview a product template without assigning it?
Add this to any product URL:
?view=your-template-name
Example:
/products/moisturizing-cream?view=serum-template
Great for testing layouts safely.
7. Can You Edit Shopify Code (HTML, CSS, Liquid)?
Yes — but only if you’re comfortable.
Go to:
Online Store → Themes → … → Edit Code
You can change:
- Liquid templates
- CSS files
- Theme assets
- Snippets
- JSON templates
If you’re learning how to edit Shopify website as a beginner, avoid touching checkout.liquid — Shopify restricts it for security.
8. Editing Product Pages — USA CRO Framework
If you run paid ads, your product page determines profitability.
Top-performing USA brands use:
- Strong hero section (title + rating + badges)
- Benefit-driven bullet points
- Problem–solution storytelling
- Lifestyle images
- UGC videos
- Sticky buy button
- Clear shipping & returns
- Social proof (reviews, certifications)
- FAQs
- Cross-sells
- Reviews above the fold on mobile
Combine this with metafields & templates → you create high-converting product pages.
Common Customization Mistakes to Avoid
Avoid:
- Editing the default template for all products
- Installing too many apps (slows site)
- Using too many animations
- Adding 20+ homepage sections
- Not compressing images
- Generic button text
- No US trust signals like UPS/USPS, secure checkout, etc.
These mistakes are common among people learning how to edit a Shopify website for the first time.
Final Thoughts — Mastering How to Edit Shopify Website
Knowing how to edit a Shopify website is one of the most valuable skills for any Shopify merchant. Whether you’re updating your Shopify home page, learning how to edit pages in Shopify, trying to edit Shopify theme files, or figuring out how to bulk edit products in Shopify, the more comfortable you become with Shopify’s tools, the more freedom you gain to grow your brand.
Hopefully, you now know how to:
- Edit your Shopify home page
- Change your Shopify home page layout
- Edit Shopify theme
- Edit Shopify website visuals
- Bulk edit your products on Shopify
- Bulk edit your tags on Shopify
- Add or edit pages in Shopify
- Edit/change product templates
- When to use Shopify metafields
- Apply CRO strategies the way winning USA Shopify stores brands do
Editing your Shopify website isn’t just about design, it’s about conversions, trust, speed, clarity, and experience.
And now you know exactly how to do it.
FAQs
Q1. How do I edit my Shopify website if I’m a complete beginner?
To get started with how to edit Shopify website, simply go to Online Store → Themes → Customize. This opens the visual editor where you can adjust layouts, colours, sections, and content without any coding knowledge.
Q2. What is the easiest way to edit the Shopify home page?
The easiest way to edit the Shopify home page is by opening the theme editor and clicking directly on the section you want to update—hero banner, featured collection, footer, etc. Shopify uses a drag-and-drop interface, making edit home page Shopify changes very beginner-friendly.
Q3. How do I edit pages in Shopify like About, Contact, or Policies?
Go to Online Store → Pages and select the page you want to edit. This is where you update text, images, formatting, and SEO settings. Knowing how to edit pages in Shopify helps you keep your policies up-to-date and your store compliant.
Q4. How do I bulk edit products in Shopify?
You can bulk edit products in Shopify using the built-in Bulk Editor under the Products section. It works like a spreadsheet inside your admin and lets you safely update pricing, tags, SEO, inventory, and descriptions across many products at once.
Q5. When should I use a CSV file to bulk edit products?
Use the CSV method only when editing thousands of products. It’s faster for large updates but riskier if formatting or encoding is incorrect. Always export a fresh file before making changes.
Q6. How do I bulk edit tags in Shopify?
Select multiple products → Click Bulk Edit → Add the “Tags” column → Update tags across your selection. This is the quickest way to bulk edit tags Shopify for large catalogs.
Q7. What are metafields in Shopify and why should I use them?
Metafields are custom fields that store extra product information—ingredients, materials, dimensions, warranty info, etc. They help you avoid stuffing descriptions with repeated text and make templates dynamic.
Q8. Can I edit my Shopify website differently for USA or other regions?
Yes. The process for how to edit a Shopify website remains the same, but you can customise regional content like shipping messages, currency selectors, and payment icons for USA, UK, Australia, or India.
Q9. Is it safe to edit Shopify code?
Yes, as long as you’re comfortable with HTML/Liquid. Beginners should avoid modifying core templates and stick to Custom CSS or hire a developer.
Q10. Why is my Shopify home page not updating after edits?
Common reasons include editing the wrong template, working on a draft theme instead of the live theme, browser caching, or hiding a section unintentionally.